Tuesday, September 29, 2009

What do you do when Life (or work) tosses you apples??

 Well you make APPLESAUCE of course!

 My boss bought about 300 pounds of apples to put on our salad bar, but did not think about how they, well turn BROWN when cut up and exposed to air... So needless to say there are like 290 pounds of apples still in our back cooler. She told me to take a few bags home.

 I sat there thinking I already HAVE apples at home, but I am NOT one to turn down food for free... I know I have a kick ass recipe for Apple Pie Muffins, but I will eat like 300 of them and get fat(ter) having made them. So I started trying to think of something fairly HEALTHY to make with them... and applesauce came to mind! So I went to my most favorite site for recipes http://www.recipezaar.com and found THIS RECIPE. Looks simple enough to make and I have ALL the ingredients on hand... Love that! So guess what I am about to do?

 Yep, make applesauce!

 Since I had SO many apples, I quadrupled the recipe as follows. This only made about a large jar, and a half worth, not more than my family of 6 will be able to polish off within a few days I am sure!

 16 apples, peeled and cored, cut into pieces
 2 cups water
 3/4 cup sugar (Should have been 1 cup but I lowered it, since I had sweet "gala" apples
 Cinnamon (just sprinkle some in there!)


 Thats it? YES THATS IT!!!!

 So you go and you peel and core your apples. This is probably the hardest part, and its not really hard!


After that cut the apples into chunks, about how you would cut potatoes to make mashed potatoes. Add the cut up and peeled apples to your 2 cups of water in a sauce pan, and cover on high heat, bring to a boil.


Boil about 20 min or until your apples are mushy and breaking up, and its starting to look like a chunky applesauce. If you want your applesauce to have less texture, then use a potato masher, or a blender at this point to puree. Add your sugar and cinnamon and continue to simmer until the sugar has dissolved.

 I let this cool on my stove top a while, and then I put it into a tuperwear bowl with a tight closing lid and put it into the fridge. I tried it warm, and it was very good. Better than store bought, and So much better for you!


So when life tosses you Apples. Make Applesauce. It's simple, healthy and TASTY! :)

Monday, September 28, 2009

Baked Potato... Pizza?

 I work at a pizza place, have now for nearly 7 years, and I have never heard of such a thing until recently. Somewhere in Little Rock there is a place that offers it. I heard it was good. Never really gave it much more thought than that. Frankly, after 7 years of looking at pizza, its usually the last thing I want to make, at home!

 Until yesterday when I was thumbing through a friends recipe book and in it was a recipe for this thing called baked potato pizza. I figured it was a sign, and I noticed that I had all ingredients on hand at home, so I thought okay. I will make it!

 Just in case you would like to make it too, here is the recipe. Well MY version of it. The one in the cookbook varied a bit, it asked for mozz cheese and parm, which I did not have, but CHEDDAR goes on a baked potato anyway right? I also used more bacon since its the meat. Tim does not like a meal if there is not meat in it. So I added in more bacon, it is turkey bacon anyway so no harm right???

 Baked Potato Pizza: 12 pieces

3 medium potatoes, peeled and cut into 1/2 inch slices
1 pound pizza dough (store bought or home made will work)
3 TBS butter
4 cloves garlic, minced
salt and pepper to taste
1 cup cheddar/jack cheese, shredded
1/2 package of turkey bacon, cooked and crumbled
green onions, chopped

 Sour cream (if desired)

 Directions

 Preheat oven to 400 degrees.

 Boil potatoes until tender.


  Meanwhile spread out dough,


                                                                                              melt butter in microwave with garlic in it.


Spread garlic mixture over pizza dough.


                                                                                Once potatoes have cooked and cooled off enough to touch, spread out over pizza dough in a single layer.


                                                                                 Salt and pepper to your taste and then top with cheese.


 Place pizza in oven until crust is done to your likeness, about 22-28 min


. Once out top with bacon, and green onions and if desired sour cream!


This pizza was a HIT with 3 out of 4 kids. I liked it, as it did NOT taste like pizza, because frankly, I am tired of pizza. This tasted JUST like a loaded baked potato! It was fairly simple to make and if your not counting carbs, its not too bad for you either! I used a pre-made pizza crust from Pilsbury and it served the 6 of us with a couple of slices left over.

 I would save left over mashed potatoes to use for this recipe in the future. I think that would work just as well, if not better than the potato slices. I will make this again, because as I said 3/4 kids liked it and those are odds you just don't mess with!

 If you try it, please comment and let me know your thoughts :)

 We served ours tonight with a salad, that I brought home from my work places salad bar (talk about easy) I cannot think of anything better to serve it with!

Saturday, September 26, 2009

Another First


Acorn squash! On a whim at the grocery I seen the pretty squash and thought heck, for .88 cents I can stand to try one (or two) of them!

 So I built my meal around this. I thought what do I have that will go with squash? I made pork chops and "hot crash potatoes"  they are good! Along with that I reheated frozen "edward style" green beans and carrots that I had forgotten to heat up the other day with dinner!

 I have made porkchops, the potatoes, and green beans for dinner before though. This was more about the squash. I did not have a recipe, really, so I just did what the sticker on the squash said to do. I added butter, and some brown sugar (I also sprinkled on cinnamon) and then I baked them, along with my potatoes in the oven.


Looking at them now, cooked and finished, I am pretty sure I could have went MUCH lighter, on the butter part! :OP Having less butter would have made a nice crust of sugar on the squash. Either way this tasted good. I, of course, was the only one who really ate it, the other kids did give it a try though.

 Anyway dinner tonight was good and easy. I just sprinkled the chops with Mrs. Dash and garlic and popped them onto my oven top grill. Voila! Dinner! :)


Friday, September 25, 2009

week 3, Second set for me!

 This week time around it was Heidi's turn to pick a chef and menu. I think she did a great job, aside from choosing a recipe with FIGS which I can find nowhere!!! I still have time, I will get that one made, eventually, although like the lemon bars, last time, I am not really looking forward to them...  Who knows right?

 So the Main course this week is: CHICKEN my hubbys favorite meat! The side dish, which again I chose to make at the same time as my  main course was ONIONS. Go figure I could not find Cipollini onions anywhere. I could not even find pearl. I found some small onions I thought were pearls eventually but upon ringing them up, she called them scallions, so I am unsure of what the heck I actually bought! Either way its what I got.

 So the chicken I was most excited about. I, unlike Tim, LOVE chicken, and I love to try it different ways! This chicken has a stuffing that adds the flavor for you.


  This is onions, thyme, salt, papper, and a lemon quartered up with some olive oil tossed around. Just that smelled great. I did not have fresh thyme, so I opted for the easier, dried variety!


After you have mixed the stuffing, you get your chicken all ready for baking. I like to rinse mine off, and then dry it with paper towels. Mine did not have any gizzards inside. I felt cheated!

 Once your chicken is prepared, you stuff it with your mixture, and you tie it up. I do not normally tie up my chickens, but because this recipe said to do it, I did it. Do not look at my picture as an idea for how to do it, because I more than likely did it the incorrect way. Oh and once its tied up and stuffed, you top it with BACON!!! You cant go wrong there!!!

 As you can see, I popped in the oven all excited, almost forgetting it needed its picture taken!!! I was maybe a bit hungry?

 SO once its cooked for a while 45 min I believe, you add your mushrooms. Oh my goodness. The aroma of the mushrooms cooking... Well you might drool! MMMMMM.

 Mine took much longer to bake than the recipe says. I probably had a bigger chicken, and I probably hung the door open too often wanting it to hurry.Either way, it smelled delisiouso and I had high hopes, but before I get to the end of that, I had to make the onions!!!


 So you put them into hot water, to get the skins to come off easily. This did not work for me, but then again I was using the wrong kind of onion, so that might be why! I had to cut the ends off most of them and peel and it was not easy (I might have cursed Heidi a bit) Once they are peeled, you toss them with the other ingredients. Once tossed add them to a pan and sizzle. MMMMM


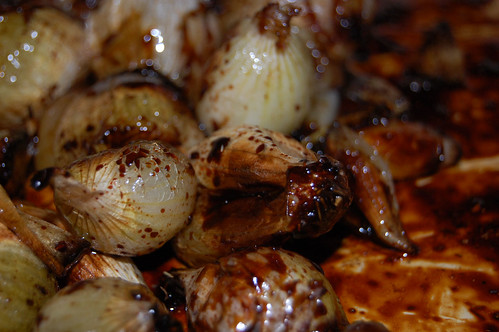
Once they have sizzled a while you put them into the oven to cook, or caramelize. Like this They looked and smelled FANTASTIC! I think they were super pretty! The pan, however, was NOT fun to clean out. I may have said bad things about Hedi again, under my breath :OP


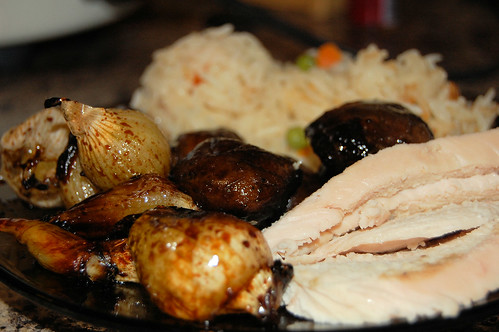
 So although during my shopping process, and my starving waiting for the chicken to be done which by the way looked pretty good when finished, although I think my bacon got a bit overdone


 The mushrooms were everyones favorite part (well except my 2 that dislike mushrooms) they tasted like the kind at the chineese buffet we often go to. MMMM. I will make it again, if nothing more than for the shrooms! Very good A++ for those, the chicken was moist, and had a nice flavor, but I mean it was nothing extrodinary to me, tasted like chicken, for the most part. The bacon did help it stay juicy though.

 The onions I liked the idea of the onions. I think had I used regular onions and cut them up, I would have liked it. The onions that I used, were very strong flavored in the middle. I did not so much care for them, but want to try it again, for sure, if I can ever find the correct onions!

 I served this dish along with my Rice pilaf recipe. I thought it was a great meal, and I am glad I had the chance to make it!!!


 check out the blogs of Heidi, Laurie and Steena to see how the recipes turned out using the right ingredients!


Appetizer Time!

 The Appetizer Heidi picked this week is prosciutto roasted figs. I must say going into this one, I am wondering what Hedi is thinking? I have never had, a fig, seen a fig, and I did not find FRESH figs anywhere!!! I settled for the dried variety which BTW is in near the raisins. Thanks for that info  Laurie!!!

 Next I sent my hubby out to do my dirty work, buying the ingredients. He came home with Pancetta NOT prosciutto, I thought OH wonderful, here I go again, screwing up yet ANOTHER recipe by NOT adding ingredients, losing them or getting the wrong thing...  So I googled, Google is my friend. I asked it weather it was okay and I got this It IS okay no harm were its exact words!!! So I am currently soaking my figs, and I will go on to try this recipe, with an open mind.


 The kids, however, minds are closed. They all asked me WHY I was making this. Why anyone would stuff cheese into something that tastes like a raisin, and then wrap it in bacon. They have said they MIGHT try it. I just pulled them out of the oven (the alarm is going off) so we'll see what we all think here soon.

 My six year old, who was just set up with a yahoo account by her sister, and I, had this way cute conversation:
My Baby Girl: wht als do you wut to tacka balt
Clorie NoneYA: I dont know
Clorie NoneYA: I love you.
Clorie NoneYA: Are you going to try one of the figs I am making?
My Baby Girl: i dot no olley if u tri owe fist
Clorie NoneYA: ok Ha ha

 So if you do not know what a fig is... Like me, this is what it looks like:


and stuffed with cheese, like the recipe says to do


 After you have slit each one, and wrapped it in the bacon(y) ham type stuff...  and then you pop the bad boys in the oven for about 15 min.


So the figs come out of the oven, Once they have cooled a bit you put them onto a serving platter, drizzle with honey, and sprinkle with pepper and then serve!


   So they looked pretty, they smelled nice. Taste. Hmmm. Well they tasted like a raisin wrapped in bacon, with blue cheese inside of it. Not my idea of  yummo. Not horrible. I will not make them again though, unless someone says Hey can you make me bacon wrapped cheese stuffed figs? Which I doubt anyone would ever ask me to do!

 Oh and since I have 6 "reviewers" in house:

 Destiny: She did not even try one she just texted on her phone. 13 year olds. Sheesh.
 Promise: She had one in her hand, licked her fingers, and decided she did not want to try it
 Hannah: She had to see me eat one first, I took (another) bite, and handed her the other half, she said EEEEEWE After a bitty taste and asked where the trash can was at.
 Bailey: He asked "Are those things good?" Licked one and said NO WAY.
 Tim: Tim liked them. He's a freak. Promise took one back to him and he popped it into his mouth and said MMM Pretty good. She took him more and apparently he ate them as well. Hmmph.


 So there you have it. Another recipe down. Although I did not care for it, I did learn some things. Blue cheese tastes different when melted, and I like it. And I like that bacon(y) ham stuff! I will buy more and use that again! So I am not upset that I made this. I also learned that I am pretty sure, figs, do not appeal to me. Not even in a "newton".

A Simple Classic

So who would believe, I have never, in my life made, from scratch, chocolate pudding!? Any pudding in general actually. I am not sure I have ever even EATEN pudding made from scratch. I always thought that is was something that was difficult to do.


 When I seen Heidi has this chosen as dessert, I was happy (because it was a "normal" food) and also a bit nervous it was going to be hard. I had it in my  mind, that it was going to be similar to making fudge, which for some reason I cannot do!


 Checking out the recipe it actually looked fairly simple. I got very excited to make it! Why it was the last one I made, I am not sure! This morning though I made an awesome Pot Roast, I figured while I was at it, I would do up some of this pudding so that it would be set, and ready for the kiddos to eat for dessert.


 So I assembled everything needed, which is NOT much!
  All that is needed is Milk, sugar, cocoa, egg  yolks, cornstarch and vanilla and oh yes, not pictured, salt. That is awesome! I bet most the time all of us have those things on hand. Who needs to buy a box to make this stuff???


 So you take 1.5 cups of your milk, your sugar, your cocoa and your salt and you  whisk while you heat it up, simmering.


 Meanwhile you mix the other .5 cup of milk with the egg yolks, cornstarch, and vanilla. Once your hot mixture is mixed well, you S L O W L Y add it, to your cold mixture (the one with the eggs) while stirring. This has to be done SLOWLY so that you do not COOK your eggs. I remember this from "food network" I knew watching would come in handy!


 ((I used my leftover egg whites to make myself an omelet))


Once you have heated your mixture and it has thickened, you put it in bowls. The recipe says to put it into 6. I tried that, but my bowls were kind of big and it looked like nearly nothing was in them so I poured the pudding into 4. Hoping the kids would share, at least a bite with mommy.

Once this is done you put them in the fridge to set. Overnight is suggested, but mine sat from 9am-8pm and that worked for us!
 Once your ready to serve, you take your whipping cream, and well... You whip it! I added a bit of splenda, to my whipped cream, because it seemed well not sweet!
Top your whipped cream onto your pudding and ENJOY!


By the way I did get to have a taste, or two. The kids loved it. I loved it. Tim loved it. I swear I will not make the boxed kind again. This is JUST as easy, well almost. and its VERY very good.


 So this challenge was a bit harder on me. I had a hard time finding several ingredients near me. I did not like the figs AT.ALL. I am not sure what anyone was even thinking coming up with that idea. I did hear that Heidi, and Laurie enjoyed them. I am unsure of Steena's response yet. Be sure to check out their blogs to find out how they did. 

 Of all the recipes this time I have to say the dessert was my favorite one. 

The chicken was good, but I really REALLY loved the mushrooms in the dish the most there.


The onions, I think if I would have had the right kind I would have liked. I will make them again, maybe using just "normal" yellow onions.


The figs, well I have spoken my feelings about the figs already. I just do not like figs. 
So. 

 This challenge was fun, and I am super excited because this following week its MY TURN to pick the chef and the recipes!! I need to get going on picking them out!

Tuesday, September 22, 2009

Nothing like coming home to a dinner already made for you!

 Tonight, well this morning really I got up, got the kids off to school and set out to make Stephanies Pot Roast.

 I have had her roast before, made by her and it was fantastic. When she wrote a blog about how to make it I knew, that was going to be MY dinner one night this week. And so that night, was tonight.


 So after the kids were gone I assembled my stuff needed to make my roast.


I bought the Sirloin Tip for mine just because it was the largest roast at the store I went to. My hopes were to have leftovers, so I could make Manhattans for dinner later in the week! That is a HUGE hunk o' Meat!


 So first I had to sear my meat. Again... Searing. I hate it. BUT. Stephanie told me it had to be done. I burned myself, and I cursed her. :OP It is all her fault, I should have taken a photo of my wounds.


 You take the oil that popped all over your arm in the pan, and you add your flour to make your roux. I know about roux, but I believe this is the first time I have actually make one, besides doing it with sausage gravy.

 You keep whisking, and whisking, and whisking... untill your roux turns dark brown. I am not sure this was "dark" brown, but I was tired of whisking, it was early and I had only had half cup of coffee. I called it good.


 So then you mix up your soup and your water mixture, and you add that to the roux, and you make gravy.

 You have your roast already put into the crock after being seared, and burning yourself, and then you cover it with this super yummy smelling gravy and some butter... cant go wrong with butter! Keep it on high, while you cut your potatoes and carrots.

 Now I did not cut my carrots, I never do. I keep them whole and use the baby ones. I also used red potatoes, because its what I had on hand! It was hard adding them to the crock, I had SUCH a large roast, that it took up a good deal of space in the crock! So I had to fight to get my veggies down in the gravy. Maybe next time I should try a smaller roast? NAH!


So once that is finished, your pretty much done. Turn it to low and let her cook. All day. Do chores, go to work whatever. I am GLAD I did go to work, because being at home smelling this all day would have KILLED ME!!! When I came home it smelled like a chef had been working in my home while I was away!!! MMMMMMMM.


 So turns out tonight was a fantastic night for a crock pot meal too. I had 2 choir things to go to, and lots to do. So once I got the kids home, settled, I opened the loaf of fresh made (storebought) french bread and spooned this out into bowls and called it dinner. I called it a FANTASTIC dinner.


Thanks again, to Stephanie for a wonderful recipe, that I will make again and again. And for the life long scar I received making it :)

Saturday, September 19, 2009

Green Chilie Chicken Enchilada Casserole MMMMM

 This is a recipe I originally got from Saving Dinner which if you want a really awesome cook book, with low cost meals and a shopping list for each week MADE FOR YOU I suggest this cookbook. I cooked almost every recipe (in order) in the book. I would have to say I liked 85% of them and that I remake at least 50% of them pretty often! If you want a new cook book, that is the one you should get!

 So This one, the green Chile Chicken Casserole, I have made so many times, I do not need to look in the book anymore. I have changed it a bit, to make it "my own" and still add things from time to time just to change it up. Tonight, I had 2 extra kids in the house, and it was GONE. Normally I have left overs to enjoy for lunch 2 times at least! I was happy, but upset all at once about this. Might have had something to do with the fact that it was 8pm before we ate! Either way, they ate, and I only had ONE Pan to clean up! :)

So here is what you need:
Chicken breasts (I use four good sized ones)
Corn tortillas (12) I like to use the white corn, that is of course my preference use what you like flour would work too
 Green Chili enchilada sauce
 1 cup sour cream (I use light, and I mix it with water to make it easily spreadable)
 2 cups cheddar or Mexican cheese, shredded (I use 2% cheese to make this "lighter")
 Cumin, Garlic powder, and olive oil

 Things I think also go well:
 Black olives
 green onions, chopped
 Tomatoes, diced


Preheat your oven to 350, and then take your chicken breasts, and season them both sides with some cumin and garlic powder if you want salt and pepper too. Whatever you want really, if you want it spicy add chili powder whatever really. I use the cumin  and the garlic powder.

Cook your chicken in some olive oil, until it is done through (no longer pink inside) It will smell yummy and you may want to munch some right now. That's ok!

 Chop, your chicken or if you have patience you can wait for it to cool and then shred it with a fork. I have used my food processor a few times to just pretty much grind it up too. Today I did not want to wait for it to cool, so I put it on the cutting board and I chopped it into strips, or chunks. It looked like that, and anyway it does not matter how its cut, it all tastes just as good!


Once your chicken is ready, oil your 9x13 inch casserole pan. Lay 6 tortillas down on bottom, top with 1/2 your chicken, 1 cup of cheese, 1/2 cup of sour cream and 1/2 the can of enchilada sauce. Just like a lasagna then start over with your second layer!


Once your 2 layers are complete, you can top with the other things you want, or you could layer them in. Or just leave it as is, its just great that way!!!  Cover it with foil and stick it into your oven! Bake about 45 min, until your cheese is melted and your sauce is all hot and bubbly and it looks DELISH!


Doesn't that look GREAT!?!

 You wish you had a sample right? Well good news! Its super easy to make and I KNOW you heard me say it takes ONE.PAN. What busy mom does not enjoy a meal in ONE PAN?? I know I do. Left overs of this (if you have any) are GOOD as well.


I served mine tonight with black olives, baby carrots, chips and sliced garden tomatoes... Speaking of garden tomatoes, I think they may be the last, this season I will get from my garden. I will miss you, juicy red, yummy, garden tomatoes, I look forward to having you grow in my garden again, next spring!!!


So back to the subject of dinner, Here is the finished product. I used a bit too much sauce this time, I bought a BIG can, when all I needed was a small (normal 10oz or whatever size) can. Either way, it tasted great, even if it looked a little messy!

Saturday, September 12, 2009

Pizza Pockets, the appetizer, in our case, LUNCH!

Pizza Pockets

This was the final of my four recipes to make. It is the appetizer but we ate them for lunch! Because of my mishaps at the grocery store, first with them being OUT of ingredients I needed, and then my forgetting a bag with ingredients I needed. The recipe was made in 2 parts.

  Day 1 I cooked the sausage, and added the spinach. I had to use spinach in place of arugula because there was NOT one place around me that was selling it, and I was looking for lettuce, NOT CHEESE :OP (inside joke towards Steena there) 

  I went ahead and cooked up the whole package of sausage, and froze half for a later use  


 I love this sausage, its made with turkey so its healthy for you. I really hoped that the kids, and I would enjoy this recipe, because they too love this sausage!


 Once the sausage is cooked up you add your spinach, or arugula if you can find it.


If your me, this is when you realize that you do not have parm. cheese, and you take this, and put it into the fridge to make when you can get your husband to go and get you some :OP
~~~~~~~~~~~~~~~~~~~~~~~~~~~~~~~~~~~~~~~~~~~~~~~~~~~~~~~~~~~~~~~~~~~~~~~~~
 So once your husband has gotten the sauce, and the olive oil, and the cheese you needed, you can make this FINALLY!
 Add your cheese, to the sausage mixture. Then roll out your pizza dough and cut into equal size rectangles. I did not do so well on the "equal size" part. I hoped it did not matter. It didn't.

 Oh and in the purple bowl? Egg wash. I do not believe the recipe states anything about needing an egg. Luckily hubby did not have to make another run, I had eggs on hand :)

So you take about a TBS of your sausage cheese mixture and put it onto each square, then you fold each square. I found that some went into triangles, and some went into squares, again I hopped it did not matter, and it didn't! They taste the same no matter what shape! I crimped the edges of mine down with a fork and found they stuck fine without any egg wash to close.


Then you take your egg wash and with a brush paint it over each "roll" Then sprinkle the rolls with the parm you did not use inside with the meat! Pop them in the oven at 400 for about 15-17 min. Serve them with some heated up marinara sauce and ENJOY!


  They were very very good. I enjoyed them. Tim enjoyed them. 2 out of 4 kids really liked them, the other 2 were just being overly picky I think.

 I like  that these seem to be easy to make however I want to. I could put veggies in there, ham and cheese, turkey, whatever! I will make them again, in many different ways and put them into the kids lunchboxes. I think its the perfect amount of food. The crust was my favorite part, although next time I will make my own, even if from a Jiffy Mix type thing. Its cheaper that way!!!


Super yum.
 Out of all the recipes Steena, Heidi, Laurie, and I did this week. I would have to say that my favorite would be the potatoes and zucchini. The one I will probably remake the most, is that, and probably the pizza rolls, although I will change the pizza rolls up quite a bit. The potatoes I will keep just the same I believe! 
 The recipe I disliked the most were the lemon bars. I will not make them again. Ever. This challenge has been fun, I enjoyed all but losing ingredients! I cannot wait to see what Heidi picks as her recipes next week!!!
 Be sure to check out their blogs to find out how the recipes looked, and tasted to them!!! And "stay tuned" for the next "food networkers Challenge" :)